Watch the 2-minute setup
LT Elevata is a block theme for architecture studios and residential architects: new homes, extensions, renovations and planning drawings for homeowners and small developers. Its look comes from a drawing set: every section opens with a title block (sheet number, title and scale), the sheet numbers run in order down the page, and projects are shown as sheets with a title-block caption. See it live in the demo.
Section patterns (Pro)
| Pattern | Use it for |
|---|---|
| Hero with project image and start a project card | A large headline with a dash-dot section line that draws itself on load, two buttons, a card that explains the first consultation (meeting, where, what to bring, fee) and a project image running to the right edge. |
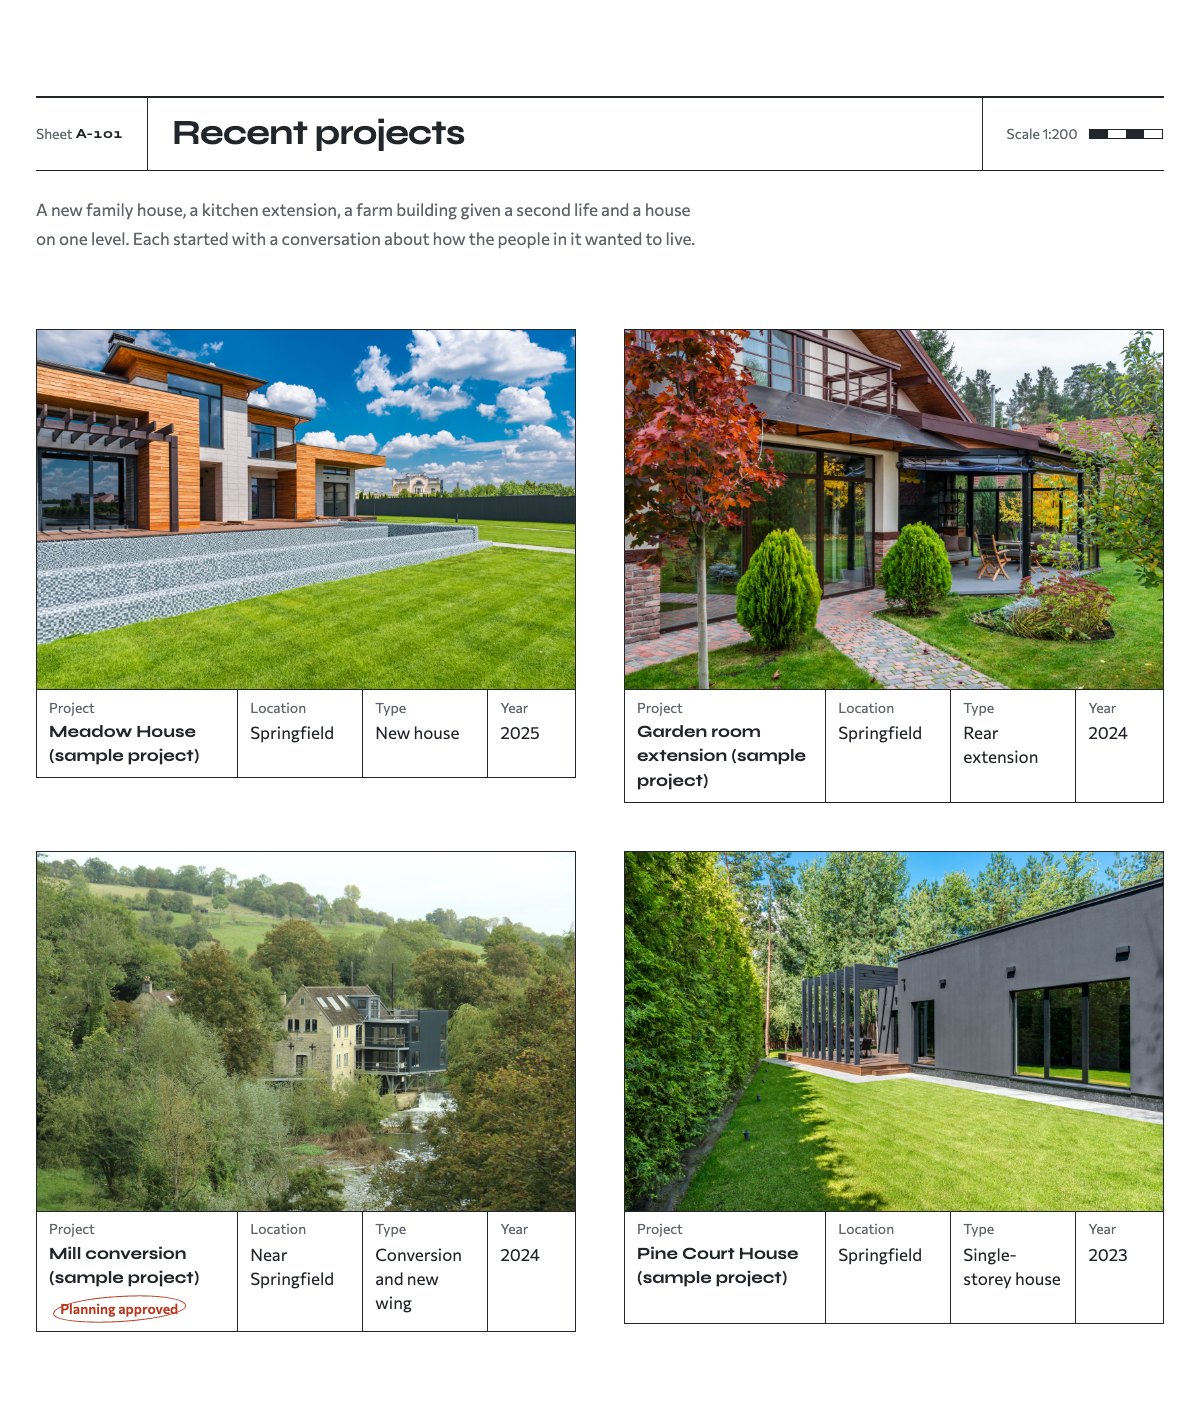
| Projects as drawing sheets | Four projects in two columns, each a framed image with a title-block caption: project, location, type and year, with an optional circled note such as “Planning approved”. |
| Services register | New homes, extensions, renovations and planning drawings as rows: icon, what it is, a link, and a list of what the client gets. |
| How a project runs | Five numbered stages (brief, concept design, planning, technical design, build), each with a line drawing. |
| How fees work | A percentage of the build cost or a fixed fee per stage, next to an example fee schedule table. |
| About the studio | A framed studio image, the studio’s story and a ticked list of how you work. |
| The studio team | Three framed portraits with role and a one-line bio. |
| Client reviews | Three sample quotes under hairlines (use real reviews only). |
| Questions about planning and timelines | Planning permission, timelines, build cost, small projects, builders and the first consultation. |
| Your first consultation | What the first meeting covers and what to have ready, as two ticked lists. |
| Studio hours and location | Studio hours, address, phone and a map with directions. |
| Contact details | Call, email and visit, each under a hairline. |
| Consultation call to action | Cyanotype band with a title block, booking and phone buttons. |
| Latest articles | Your three newest blog posts. |
Page layouts (Pro)
- Home page: the complete homepage.
- Services page: services register, how a project runs, how fees work, questions and the call to action.
- About page: the studio’s story, team, client reviews, recent projects and the call to action.
- Contact page: contact details, the first consultation, studio hours with map and the call to action.
How the title blocks work
Each section starts with a title block: “Sheet” and its number on the left, the section heading in the middle and the scale on the right. The numbers (A-101, A-102 …) are added automatically in page order, so they stay in sequence when you add, remove or reorder sections. Edit the heading and the scale text like any other text; set the scale to “Not to scale” on sections where a scale makes no sense.
Demo content to replace
- Phone
(555) 017-0113, email[email protected]and the Linden Row address in Springfield (header, footer, hero, contact sections), and the street parking note. - Studio hours in the top bar, footer and the studio hours section.
- The start a project card, including “Free, with no obligation (example)”.
- The four projects marked “(sample project)”, their locations, types and years, and the circled “Planning approved”.
- The fee percentage and the example stage fees marked “(example)” and “Example prices”.
- The three sample team members, their roles, bios and photos, and the sample reviews from “Sample client”.
- The “Book a first consultation” buttons: link them to your booking or scheduling system.
Write only what is true for your studio. Do not add awards, accreditations or memberships (such as RIBA or AIA), registration numbers, insurance, years of experience or planning success rates you cannot confirm, and use the title “architect” only for people who are registered where you work. Show only projects you worked on, with the client’s permission. Do not promise planning permission, approval times or build costs: they depend on the site and the local rules.
Photo guide
Replace the illustrations and placeholder portraits with your own photos: select the image in the editor, then Replace. These sizes look sharp on large screens without slowing the site down.
| Image | Shape | Upload size | Tips |
|---|---|---|---|
| Hero image | Portrait or square | 1600 × 1800 px | A finished house or extension from outside, in daylight. The image fills the right side of the hero and is cropped to fit. |
| Project images | Landscape 3:2 | 1600 × 1067 px | One strong exterior or interior view per project. Use the same light and framing for all four. |
| Studio image | Landscape 5:4 | 1600 × 1280 px | Drawings or a model on your desk, or the studio itself. |
| Team photos | Portrait 4:5 | 800 × 1000 px | Head and shoulders, same background and light for everyone. Ask each person before you publish. |
| Map picture | Landscape 3:2 | 1600 × 1040 px | A screenshot of your map, or keep the illustration; the button links to Google Maps. |
| Blog featured images | Landscape 3:2 | 1600 × 1067 px | Shown on the blog cards and at the top of each post. |
| Logo (header and footer) | Wide or square | At least 200 px tall, PNG with a transparent background or SVG | Shown about 44 px tall. Set it in Appearance → Editor: select the logo block. |
| Site icon | Square | 512 × 512 px | The small icon in browser tabs. Settings → General → Site Icon. |
- Save photos as JPEG or WebP and keep each file under about 300 KB (a free tool such as squoosh.app does this).
- WordPress crops to the shape for you: select the image → Crop in the toolbar to choose which part shows.
- Fill in the Alternative text of each photo (for example “Our reception desk”) for accessibility and Google.
- Only use photos you own or have permission for. Ask clients before you publish photos of them.
Colour styles
Trace (default: cool tracing paper, graphite, cyanotype blue and redline marks), Blueprint (white lines on deep blue), Concrete (cool greys and slate) and Timber (walnut browns on a pale neutral). Try them in the live demo with the colour dots in the top bar.
Consultation bookings
LT Elevata has no built-in form. Link the “Book a first consultation” buttons to your booking or scheduling system, or add your form plugin’s block to the Contact page. Ask only for what you need to arrange the meeting: a name, a contact, the address of the property and a few words about the project.